Pages

Wednesday, June 26, 2019

Bright and Fun Folio

As soon as I saw Graphic 45's new Kaleidoscope Collection I knew I wanted to make an album with it.  The colors and patterns are so lively and fun they lend themselves to an interactive book.  I used the 9 x 11 Folio by Gypsy Soul Laser Cuts.
 For my cover I featured the peacock feather paper and one of the 4x6 journaling cards.
 Inside my front cover I have used some of the coordinating pockets and stickers available.
 For my first inside page I have created a waterfall that holds 22 photos.
 Using the journaling cards I created some swing out and flip up panels with photo mats on the back.


 I used some Peacock Feathers from Gypsy Soul, painted gold and coated with ultra glitter.  To highlight the photo mat I used some gold peel offs.

 The bottom panel features a fold out booklet that holds more photo spaces.

Folded open the album measures nearly 3 ft square and features space for 60+ photos.

Monday, April 1, 2019

Easter Album For A Young Friend


Here's an easily made album that is great for children and can be made in any theme.
To make the pages, start with an 8.5 x 11 inch piece of cardstock.  Score at 5.5 inches on the 11 inch side.  Score at .5 inch on the 8.5 inch side.  Cut off one side of the .5 inch flap and fold the other one inside.  Glue to create a pocket page that is open on one side and at the top.  The binding will close the side and the top is left open as a pocket for an insert.
Decorate your pages with patterned paper and coordinating cardstock.  Add pockets and journaling cards.
Flips, folds, and pop ups are popular with any age group.
Using a corner band or pocket adds space for extra photos and journaling spots.
This style page can be bound using a Cinch, Bind It All or a paper hinging system.
I used a tab punch to create a pull tap on the top of each pocket insert.
For my covers I cut two pieces of chipboard to 6 x 9 inches.  I left the extra space at the top so the tabs were enclosed in the book.
Hope you enjoyed my album.  Be sure to check out the other great albums on the Mini Album Makers Challenge Blog this month,

Paper line is Celebrate Easter by Echo Park

Friday, March 1, 2019

ABC Primer Mini Album

Here's a mini album that is perfect for a first year of school, vintage classroom photos or just for everyday.  The base page and file folder insert are quick and easy to make and feature lots of space for including photos and journaling.  


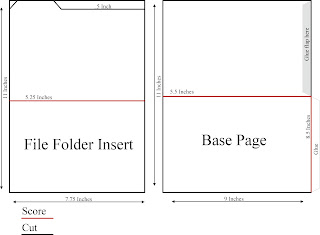
To create each base page you need 1 sheet of 12 x 12 card stock.  Cut to 9 inches by 11 inches.  Score and cut as shown in drawing.  To create each file folder you need one sheet of 8.5 x 11 card stock.  Cut to 7.75 inches by 11 inches.  Score and cut as shown in drawing.  If you want curved cuts you can use a corner rounder or envelope punch board to make them.


You can use any type hinging system you like, here I have used a hidden hinge.  Decorate your pages and add interactive sections to your own taste.  If the album is going to a child I usually keep my interactives simple so they are easy for little hands to use.

I have used Graphic 45's ABC Primer line to do this album but it lends itself to any theme.
 The first page features a belly band and a flip up.  Each page has the file folder inset to add more photo space.

 Here I have attached a swining tag to hold the interactive closed.
 And shown open once the tag is turned.
 A mirror image interactive flip page.
 A fold down page and a side pocket.
 Sideways waterfalls add lot of photo spaces.
 This page features a string tie pocket to hold ephemera.
 The last page has pockets and extra photo mats tucked in.
 And another tri-fold area for extra photos and journaling.
I hope you enjoyed my album.  Be sure to check out all the other great minis over at Mini Album Makers Challenge today.

Friday, February 15, 2019

Birthday Brag Book

Hello everyone.  I'm here today with a tutorial on this cute tri-fold brag book.  This one is themed for a little girl's birthday but this is a book that would be great for any theme.  I kept the front of mine pretty simple as it is meant to be tossed in a purse or bag and kept right at hand to show off the photos it will hold.

To create this book you will need:
(3) 12x12 inch sheets of base cardstock (I used black)
(2) 12x12 inch sheets of coordinating cardstock (I used Bazzill Julep)
(4-5) 12x12 inch sheets patterned paper (I used Pebbles Birthday Wishes)
Coordinating Cut aparts or embellishments
1 yard of ribbon or other trim that can easily be tied.
Wet glue
Double sided tape

Begin by cutting a piece of your base color cardstock to 12 inches by 7 inches.  Score at 5 inches, 6 inches and 11 inches on the 12 inch side.  Put aside.
Cut a piece of your base color cardstock to 6 inches by 7 inches.  Score at 1 inch on the 6 inch side.

Using double sided tape on the edges as shown, and wet glue in the center, overlap and attach the two pieces of your base to form a single piece 17 inches by 7 inches.  Fold and burnish all score lines.
Turn over your base piece so you are working on the outside of the base.
Using double sided tape and wet glue, attach your ribbon to the front, spine, back and second spine as shown below.  Be careful that you do not attach the ribbon to the inside flap.
Cut 6 pieces of your coordinating color card 4 3/4 inches by 6 3/4 inches, and 4 pieces 3/4 inch by 6 3/4 inches.Put three of the large pieces and two of the smaller pieces aside to use later on the inside of your folder.  Attach the cardstock panels as shown, remembering to place the inside panel piece directly against the base with the ribbon over it.

To create the insert photo booklet you will need two pieces of your base color cardstock, each of them 6 inches by 12 inches.  Score each piece at 4 1/2 inches and 9 inches along the 12 inch side. 


Overlap the two 3 inch sections by 1 1/2 inch and attach. 


Accordion fold to create your booklet.


For the pocket you will need a piece of your base color cardstock that measures 4 3/4 inches by 7 1/4 inches.  Score and cut as shown in the diagram below.  Attach pocket to middle inside panel over the coordinating cardstock.


Cut your patterned paper to fit your panels and decorate to fit your theme.


Use coordinating cut aparts and stickers to decorate your pages.


Thanks for visiting and checking out the tutorial for this little book.  I hope you enjoy making it as much as I have.

Friday, February 1, 2019

Bracket Edge Top Close Mini Album


Good morning everyone.  Today I want to share this adorable album created with the newest Gypsy Soul album base.  This is the Bracket Edge Top Close Mini Album and ships in three easy to assemble pieces that feature flip panels with the pretty bracket edge.


The album is assembled by gluing the two side pieces to the base.  I used Scotch Quick Dry glue to assemble mine and it is quite strong.


The kit also includes two sets of graduated tracers, used to mat cardstock and paper.  Once the album is assembled you can add extra features such as flaps, pop ups, belly bands, etc. by attaching cardstock.  My album was made using Bo Bunny's Soiree collection.


I created some extra photo space by adding tri-fold photo folios in pockets and tucked into belly bands.  I added photo mats that I created using a decorative corner punch.


Extra details were added using coordinating cardstocks cut with different dies and punches.


I reused the traces that fit the flip panels to create an extra bracket edged fold out from cardstock and patterned paper.


Be sure to check out the other mini albums featured today over at Mini Album Makers Challenge.